AWS CDK is my first choice when choosing an IaC for AWS (actually, it's a lie; it's SST). Using the same programming language for IaC and application development is convenient, allowing me to use the same tools without switching contexts.
Another powerful asset is L3-Constructs or patterns. L3- constructs simplify multiple resources for common tasks. One of them is the ECS-Pattern.
However, they abstract away many resources, and in this blog post, I am going to demystify the ApplicationLoadBalancedFargateService construct.
ApplicationLoadBalancedFargateService
Let’s break down the verbose construct ApplicationLoadBalancedFargateService into their resources and what code you may need.
Minimal
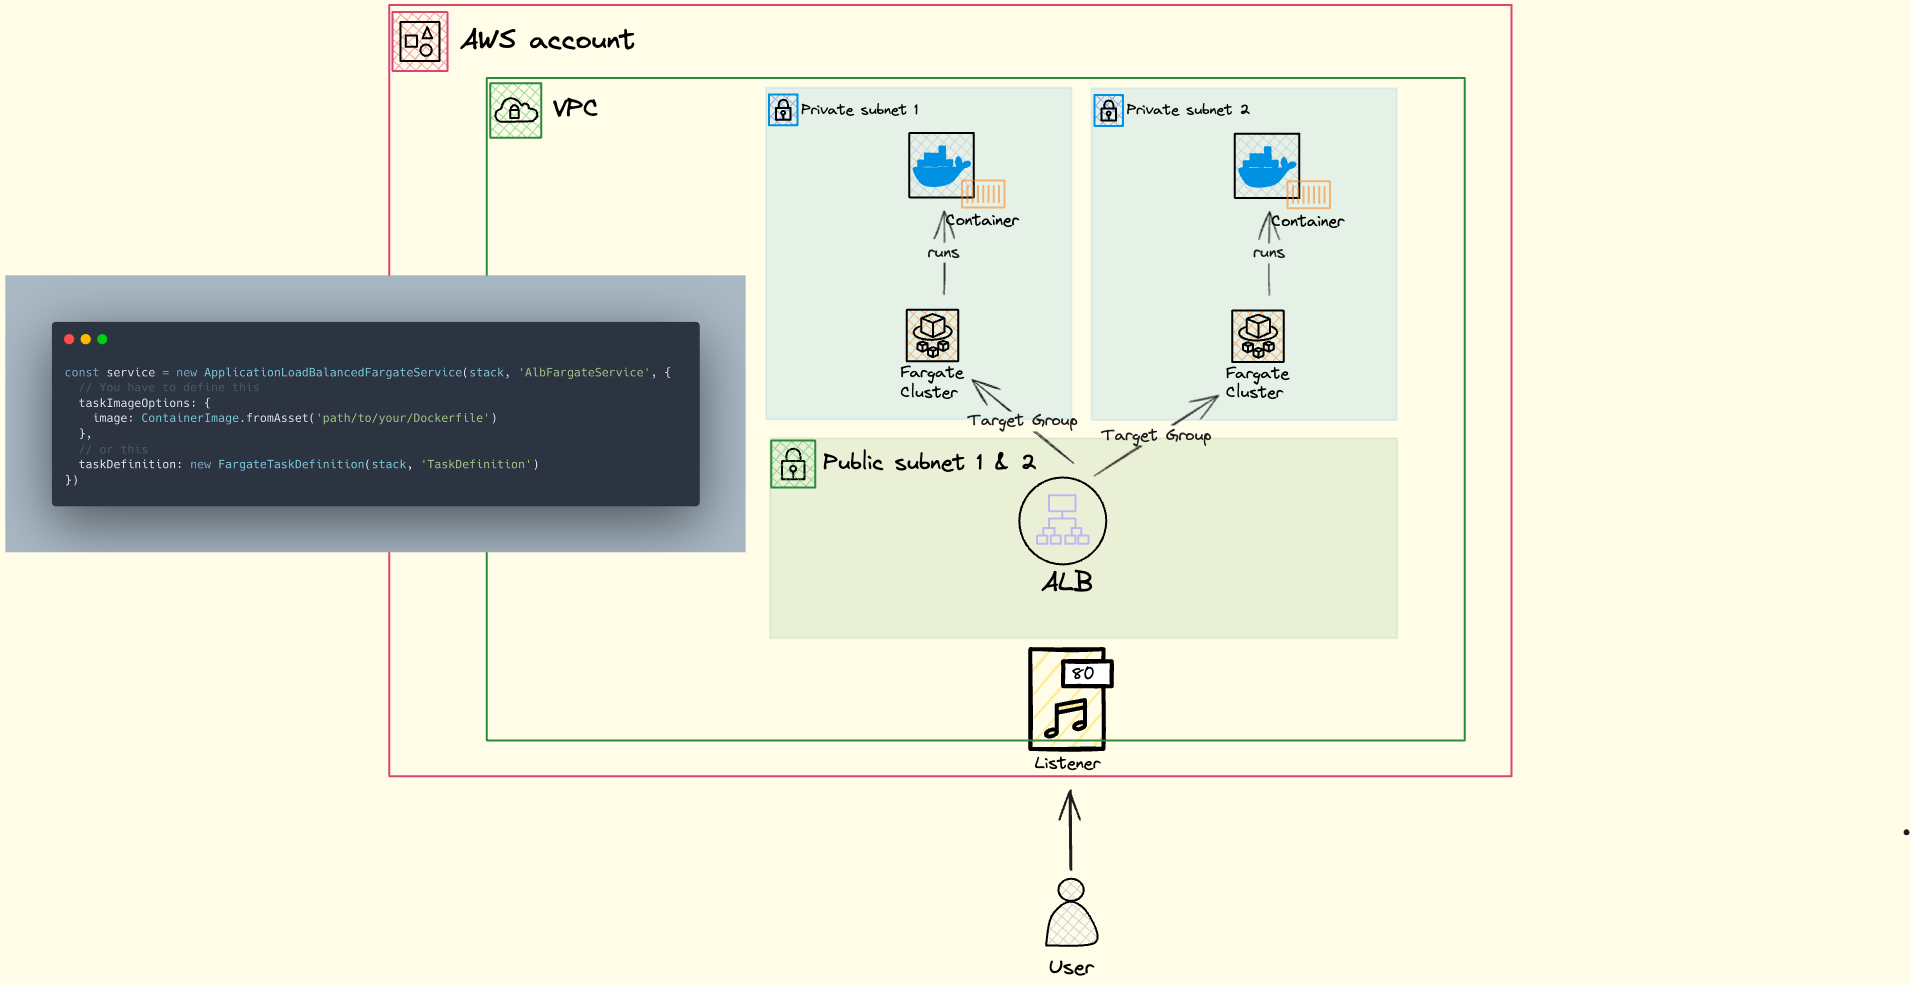
Below is the minimal code that deploys an Application Load Balancer, a Fargate ECS Cluster and task, Target Groups, and a Listener on port 80. Depending on the deployment region, the code deploys a VPC and at least two private and public subnets.
const service = new ApplicationLoadBalancedFargateService(stack, "AlbFargateService", {
    // You have to define a task image option
    taskImageOptions: {
      image: ContainerImage.fromAsset("path/to/your/Dockerfile"),
    },
  },
);
Or if you want to use your own taskDefinition:
const service = new ApplicationLoadBalancedFargateService(stack, 'AlbFargateService', {
  // The task definition will mostlikely be bigger as you need to pass props
  taskDefinition: new FargateTaskDefinition(stack, 'TaskDefinition', {
    // here you will need add props which looks similar to above `taskImageOptions`
  })
})
That is what you will get. Out of simplicity, I left out the IAM roles and policies.

When using the taskDefinitionyou often need to configure the container, which usually ends up in more code.
HTTPS
However, the minimal code approach only listens on port 80 (HTTP). If you want to create a serious application using AWS ECS Fargate, you want HTTPS (port 443).
As a pre-requisite, you must have a Hosted Zone and a domain name in your Route53.
new ApplicationLoadBalancedFargateService(stack, "AlbFargateServiceHttps", {
  taskImageOptions: {
    image: ContainerImage.fromAsset("path/to/your/Dockerfile"),
  },
  publicLoadBalancer: true,
  redirectHTTP: true, // Best practice to redirect if calling URL with `http`
  cpu: 512, // <-- Default: 0.25 Otherwise container dies to quickly
  memoryLimitMiB: 1024, // <-- Otherwise container dies to quickly
  domainName: "my.example.com",
  domainZone: HostedZone.fromHostedZoneAttributes(this, "HostedZone", {
    hostedZoneId: props.hostedZoneId,
    zoneName: props.zoneName,
  }),
});
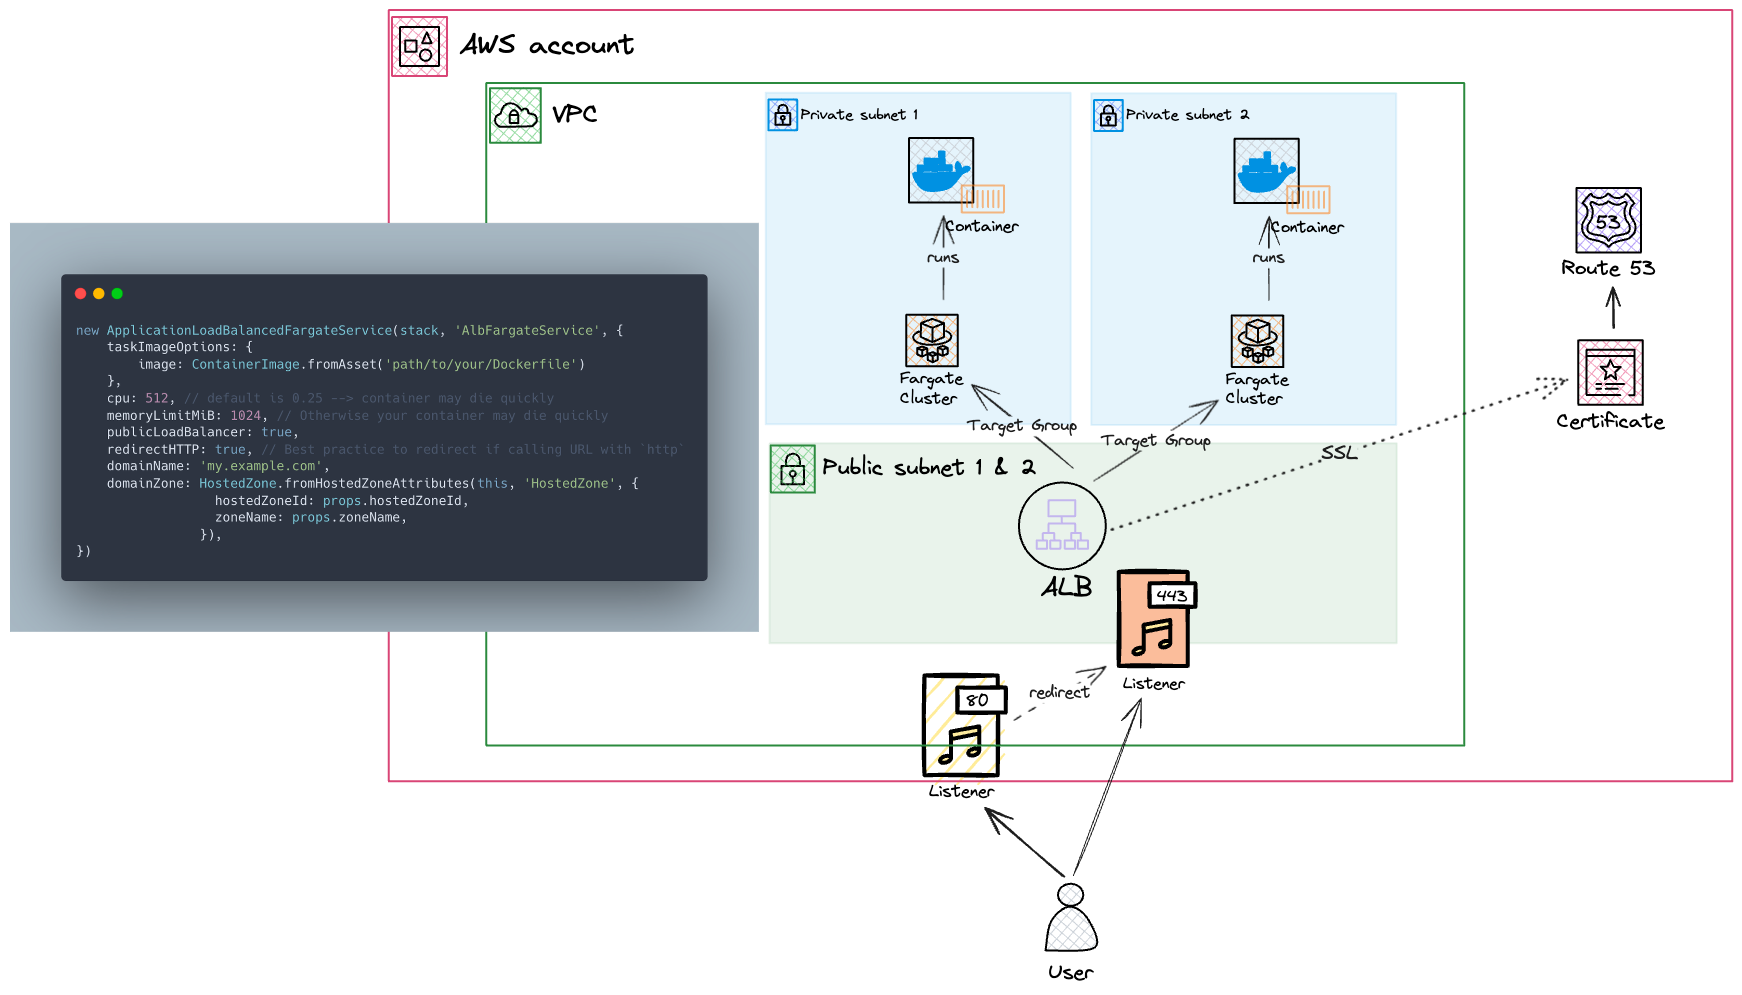
And this is what it looks like

7 extra lines create a second listener on port 443, and the Application Load Balancer (ALB) terminates HTTPS with an AWS Certificate Manager (ACM) certificate. This certificate will be automatically created when adding domainName and domainZone.
Now, you will be able to access your container with https://my.example.com.
Authentication with Cognito
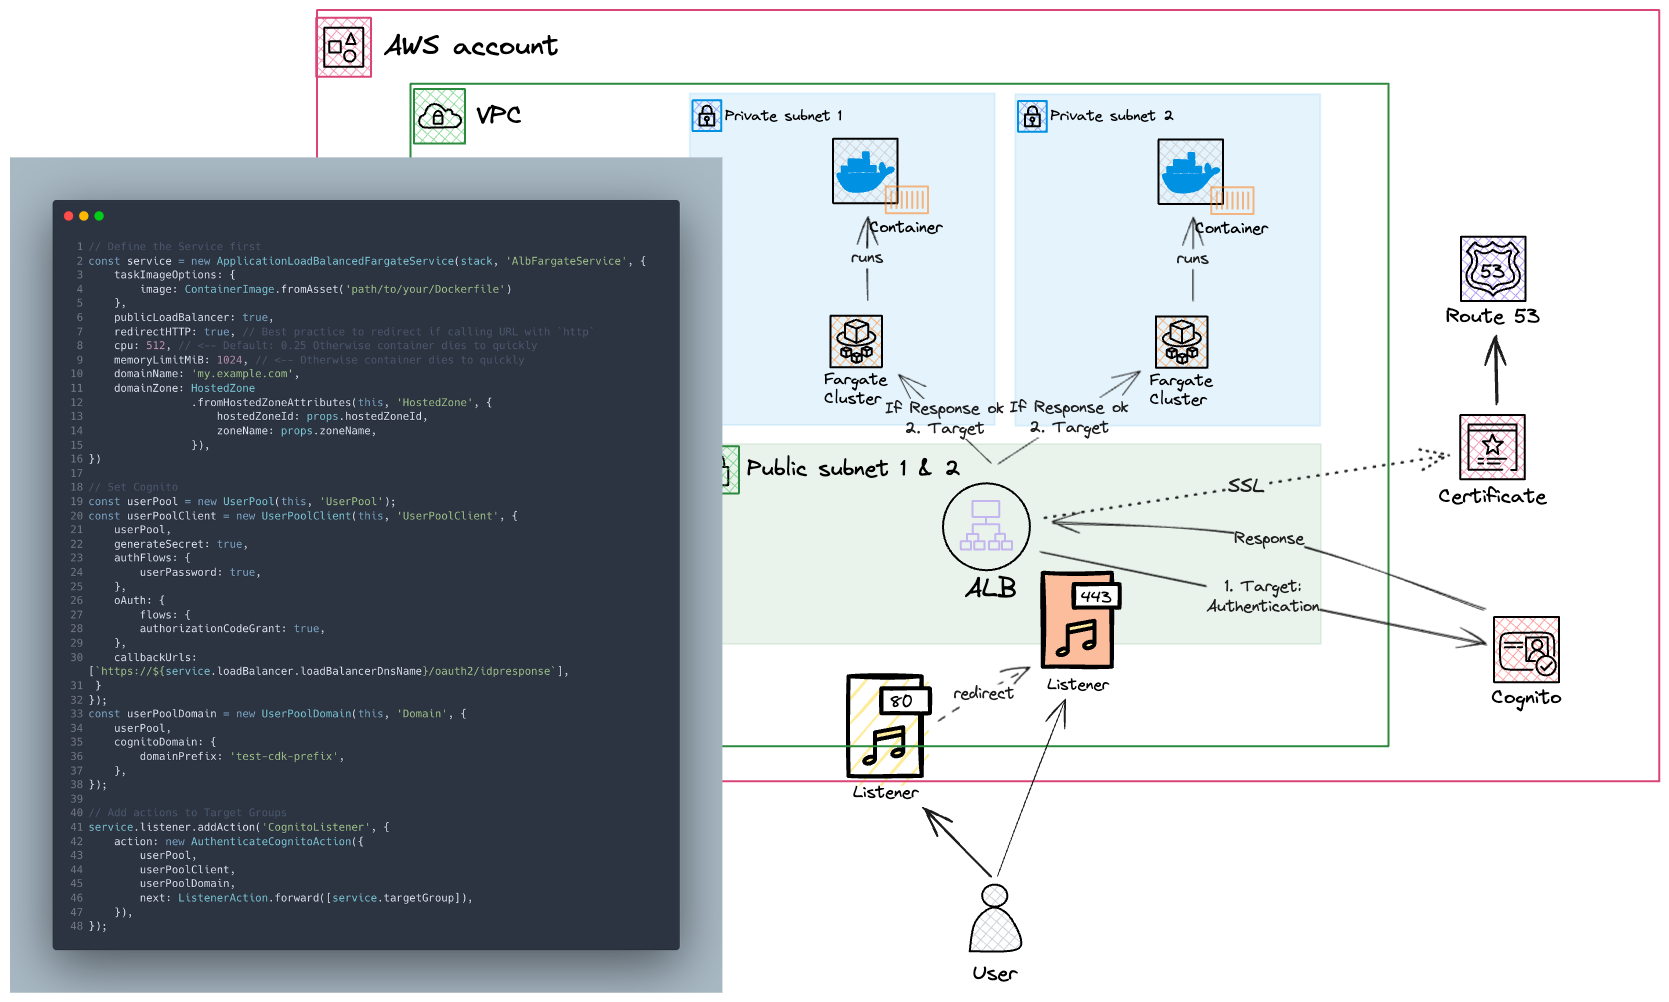
Cognito is a great option if we want to add an authentication layer. This means we must authenticate with Cognito before loading data into the Docker container. To achieve this, we add an action to our listener that tells the user to authenticate before being directed to the container.
// Define the Service first
const service = new ApplicationLoadBalancedFargateService(
  stack,
  "AlbFargateService",
  {
    taskImageOptions: {
      image: ContainerImage.fromAsset("path/to/your/Dockerfile"),
    },
    publicLoadBalancer: true,
    redirectHTTP: true, // Best practice to redirect if calling URL with `http`
    cpu: 512, // <-- Default: 0.25 Otherwise container dies to quickly
    memoryLimitMiB: 1024, // <-- Otherwise container dies to quickly
    domainName: "my.example.com",
    domainZone: HostedZone.fromHostedZoneAttributes(this, "HostedZone", {
      hostedZoneId: props.hostedZoneId,
      zoneName: props.zoneName,
    }),
  },
);

// Set Cognito
const userPool = new UserPool(this, "UserPool");
const userPoolClient = new UserPoolClient(this, "UserPoolClient", {
  userPool,
  generateSecret: true,
  authFlows: {
    userPassword: true,
  },
  oAuth: {
    flows: {
      authorizationCodeGrant: true,
    },
    callbackUrls: [
      `https://${service.loadBalancer.loadBalancerDnsName}/oauth2/idpresponse`,
    ],
  },
});
const userPoolDomain = new UserPoolDomain(this, "Domain", {
  userPool,
  cognitoDomain: {
    domainPrefix: "test-cdk-prefix",
  },
});

// Add actions to Target Groups
service.listener.addAction("CognitoListener", {
  action: new AuthenticateCognitoAction({
    userPool,
    userPoolClient,
    userPoolDomain,
    next: ListenerAction.forward([service.targetGroup]),
  }),
});
Line 34 is crucial for redirecting back to the load balancer domain. Lines 46 - 53 describe the new action for the listener, where we add the Cognito Suite from lines 22-43.
The “simplified” diagram

Cognito with Custom Domain and Identity Federation
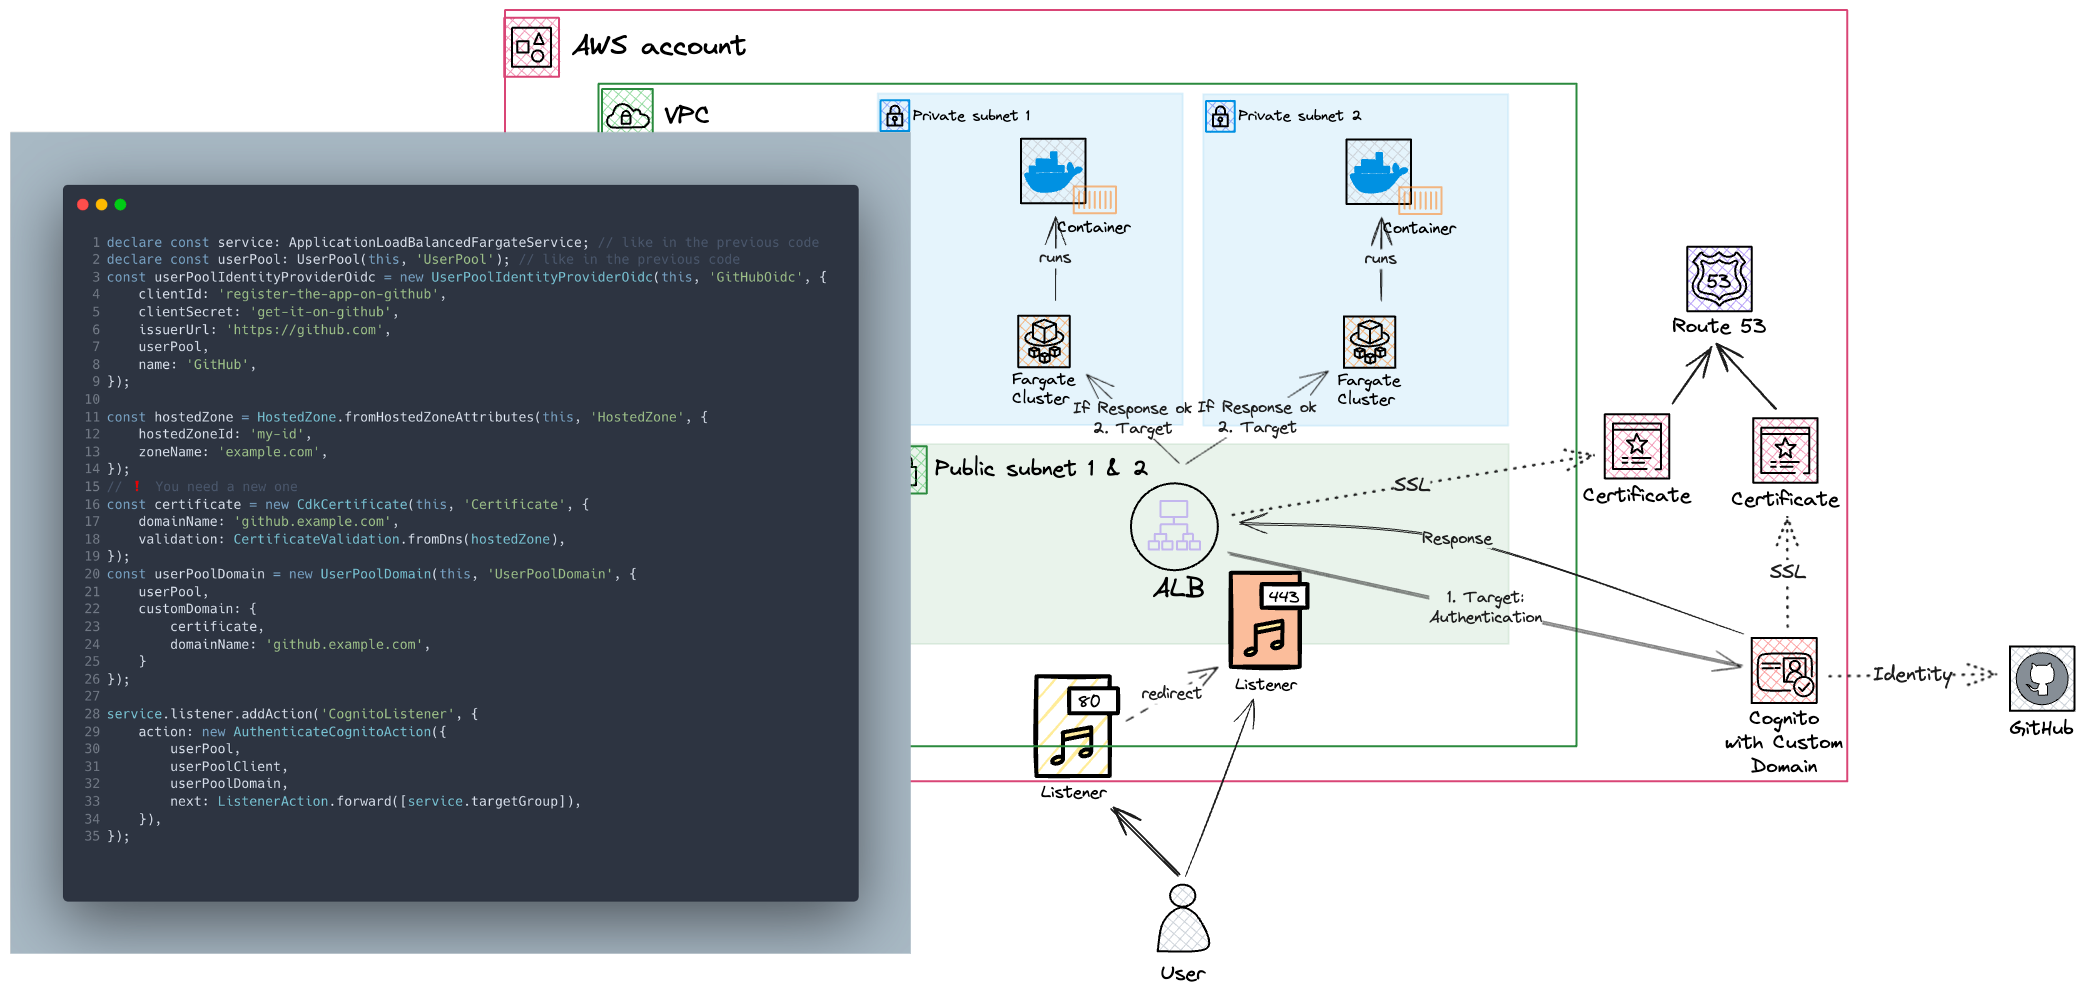
If we want to use an Identity Federation like GitHub, we can utilize an L2-Construct UserPoolIdentityProviderOidc. Moreover, if we aim to establish a personalized domain for our login page, we need to generate a certificate initially and then add it to Route 53's Hosted Zone.
declare const service: ApplicationLoadBalancedFargateService // like in the previous code
declare const userPool: UserPool(this, 'UserPool') // like in the previous code
declare const userPoolClient: UserPoolClient(this, 'UserPoolClient') // like in the previous code
const userPoolIdentityProviderOidc = new UserPoolIdentityProviderOidc(this, 'GitHubOidc', {
    clientId: 'register-the-app-on-github',
    clientSecret: 'get-it-on-github',
    issuerUrl: 'https://github.com',
    userPool,
    name: 'GitHub',
});

const hostedZone = HostedZone.fromHostedZoneAttributes(this, 'HostedZone', {
    hostedZoneId: 'my-id',
    zoneName: 'example.com',
})
const certificate = new CdkCertificate(this, 'Certificate', {
    domainName: 'github.example.com',
    validation: CertificateValidation.fromDns(hostedZone),
}); // ❗ You need a new one
const userPoolDomain = new UserPoolDomain(this, 'UserPoolDomain', {
    userPool,
    customDomain: {
        certificate,
        domainName: 'github.example.com',
    }
});

service.listener.addAction('CognitoListener', {
    action: new AuthenticateCognitoAction({
        userPool,
        userPoolClient,
        userPoolDomain,
        next: ListenerAction.forward([service.targetGroup]),
    }),
});
Note: Lines 1-3 have the same implementation as in the previous section.

It is possible to use Cognito with Identity Federation and a custom domain. However, you may not require a Cognito Custom Domain if you already use ID Federation with services like GitHub, Google, or Azure AD. A custom domain is available for completeness but may not be necessary in certain cases.
Conclusion
The ECS pattern is very powerful and provides many services with less code. They still provide properties for customization. However, you most likely end up with more code (at least because of having HTTPs). What we haven’t seen are roles and policies. Do not worry the community won’t let you down and will try to reach the least privileged. And even if you have doubts, you could easily add your roles or policies.
In this blog post, we have demystified the ApplicationLoadBalancedFargateService pattern in their services, and I hope you understand this pattern a bit better. I recommend using them. However, don’t blindly trust them; check their underlying resources.

